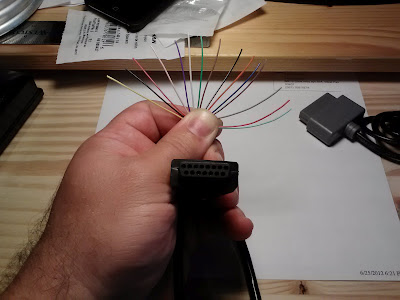
I decided to convert a SNES controller to test the MVS. The ideia is simple: re-wire the SNES controller to the MVS
 | ||
| Cheap Chinese version of SNES controller |
Step 1: Disassemble the remote
 |
| Remove the 5 screws from the back. |
 |
| Remove back to reveal wire and board |
 |
| front face of the controller |
 |
| Just the board |
 |
| De solder original cable |
Step 2: Rewire the remote
 |
| Joystick extension (cheaper than the original Neo Geo cable) |
 |
| Soldering the wires |
 |
| Credit: Image from: http://www.mmmonkey.co.uk/ |
 |
| Soldering everything |
 |
| Done! |
 |
| View from the back |
 |
| putting back together |
| DB15 pinout for this pads/sticks | |||||||
| Pin # | Description | Your Wire Colour | SNES Button | Extra Action | JAMMA P1 | JAMMA P2 | |
1
|
Common Ground
|
Brown
|
Ground
|
||||
2
|
NC
|
Red
|
L
|
Coin
|
T
|
16
|
|
3
|
Select
|
Orange
|
Select
|
d
|
26
|
||
4
|
D Button
|
Pink
|
Y
|
c
|
25
|
||
5
|
B Button
|
Yellow
|
B
|
a
|
23
|
||
6
|
Right
|
Dark Green
|
Right
|
Y
|
21
|
||
7
|
Down
|
Light Green
|
Down
|
W
|
19
|
||
8
|
(VCC +5v) *
|
Blue
|
N/A
|
5V
|
5V
|
||
9
|
(D Button) **
|
Purple
|
N/A
|
||||
10
|
NC
|
Gray
|
R
|
Future use
| |||
11
|
Start
|
White
|
Start
|
U
|
17
|
||
12
|
C Button
|
Black
|
X
|
b
|
24
|
||
13
|
A Button
|
Brown-White
|
A
|
Z
|
22
|
||
14
|
Left
|
Red-White
|
Left
|
X
|
20
|
||
15
|
Up
|
Black-White
|
Up
|
V
|
18
|
||
 |
| Final product! |
Yo boy,
ReplyDeleteYou ever finish this project up?
I was looking up info for wiring a DB 15 connector, and found your wire diagram. I took a multi-meter to mine, and our color layout is completely different. Always good to be handy with a multimeter.